Cisco IOS - How to create compliance policies
This article details all steps that you need to do in order to be able to run compliance on a single router. This is a process where you first model the router, add its configuration to Network Configuration and Change Management (NCCM), create a policy, link the router to this policy and then run compliance on it. It involves a number of steps, but once it's set up you can just let it run and won't have to do anything about it.
NetYCE supports a wide variety of different vendors (Cisco, Juniper, HP, Ciena, F5, Fortinet, Avaya, Arista, Aruba, Huawei), but let's make our hypothetical router of the Cisco IOS family. What we first need to do is to model this into NetYCE. There are two ways to do it: in the main form, creating a client, site, subnets and ports around it as well, and in the CMDB, which comprises just one entry. Modeling your entire environment is outside the scope of this article, so we'll use the CMDB for now, but the whole process for compliance works exactly the same for both options.
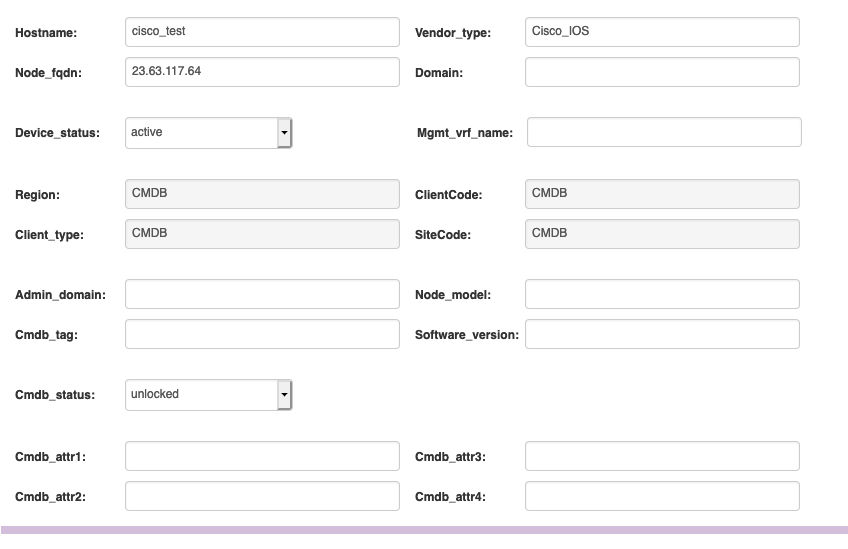
When you create a new CMDB node you don't need to fill in every value to make compliance work. The following however, is required: the Hostname, the Vendor type and the Node fqdn. We need to know the router's name, vendor and the address where to reach it. This can both be an ipv4, ipv6 or a domain name.
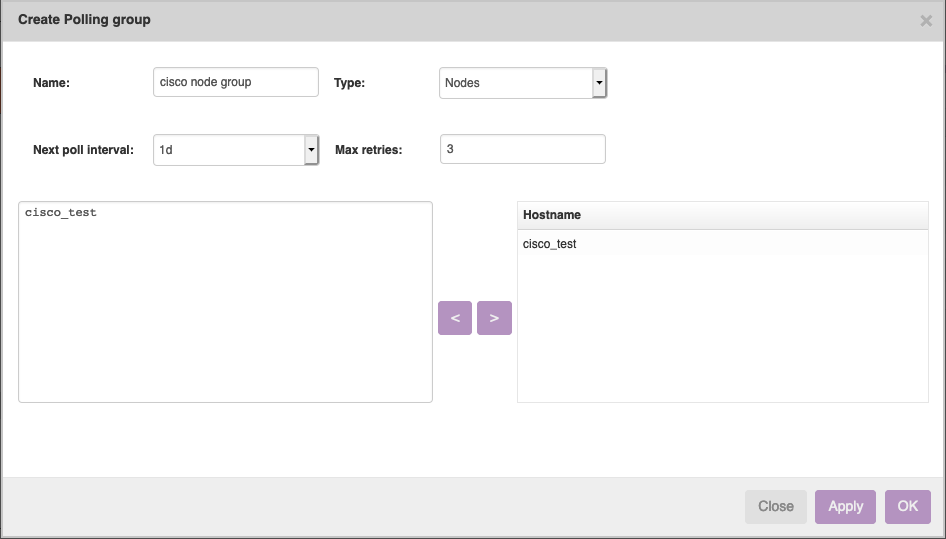
Next up is to add the node to the NCCM. To do that, we need to add it to a polling group, which tells the nccmd daemon how often it should poll the router's configuration. Go to the 'NCCM' menu item, click on the 'Polling groups' tab and then click on 'New', which will allow you to create one. There are two ways to include nodes: using node groups and actual hostnames. In our simple case submitting it by hostname works fine. Node groups can be used when you have large groups of routers that you want to control all at once. Enter the hostname, click on '>' and then on 'OK' in order to create the polling group.
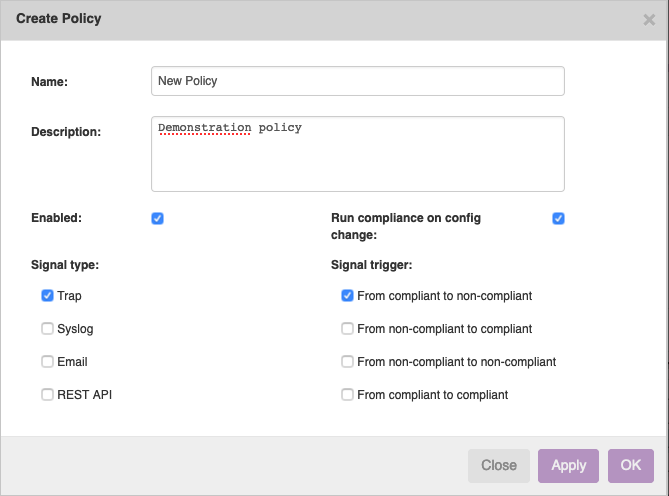
Next up, we need to create a policy to check against. In this example we will just create one policy, with one rule, with one condition. For this, go to the 'Compliance' page in the left menu, and then click on the 'Policies' tab. You will see a policy grid, click on the 'new' button to create a new policy. Fill in a name and description. Don't worry about the different checkboxes for now, just make sure that the ones before 'Enabled' and 'Run compliance on config change' are checked. They should be by default. Click on 'OK' to create the policy.
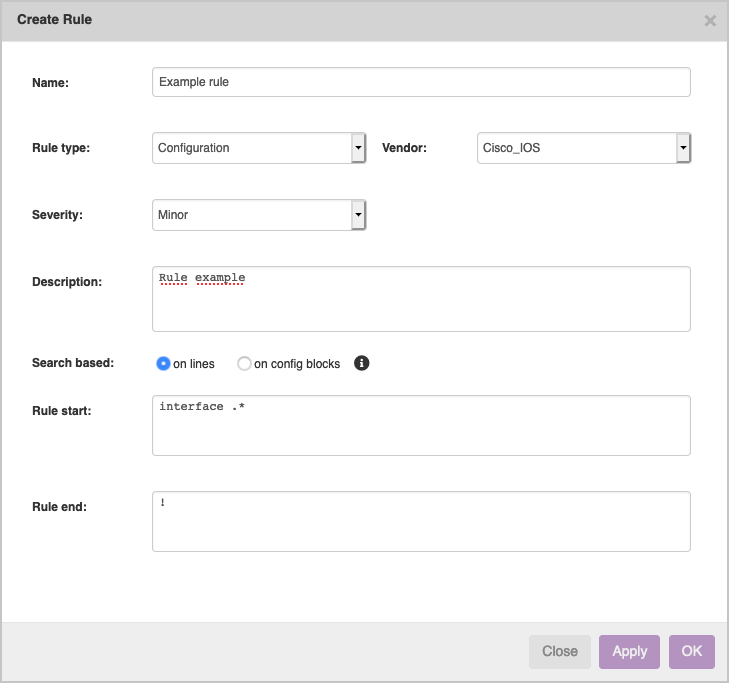
Next up is to create a rule. Click on the 'new' button under the rule grid that has just appeared. Give it a name and select the correct vendor type: Cisco IOS. We then use a simple Rule start of 'interface .*', and Rule end of '!'. This means that we will check all code blocks in the config that start with 'interface' and end with '!' (note that these can be multiple). Click on 'OK' to save.
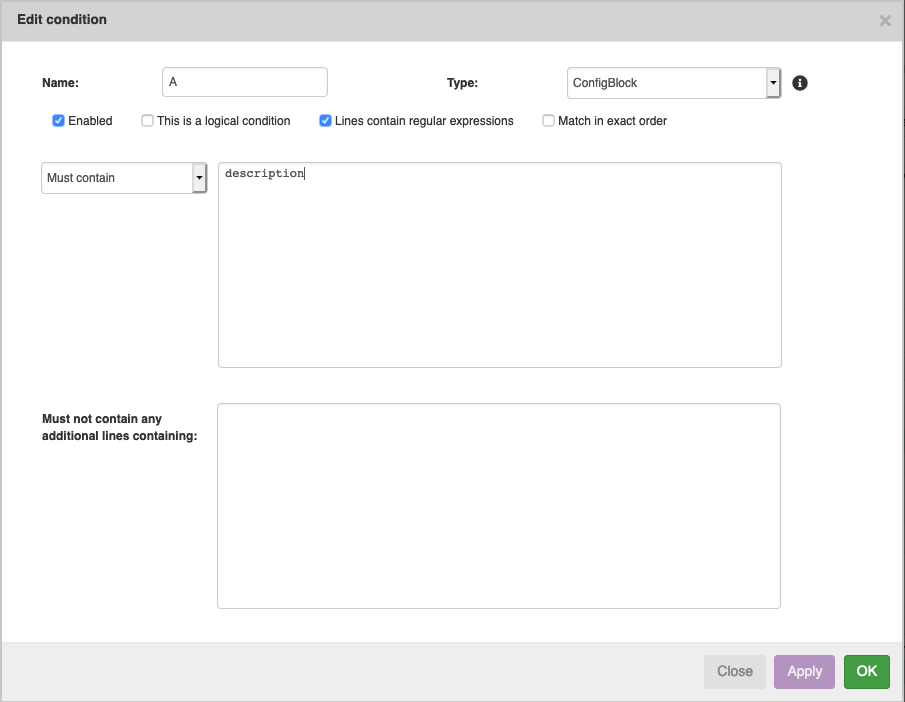
Next is to create the condition. Click on the 'new' button, which will automatically create one for you and open its details. From there you can put the lines to check against. For this example, we want each block to contain a line that contains the word 'description'. Don't worry about all the options for now, and simply put 'description' in the upper text area. Click on 'OK' to save the condition.
Now that our policy is created, we need to link it to our node. At the node group grid, click on 'new'. Here, you can search for the node group. Since we are dealing with a very simple case here, you can simply select the default node group 'Cisco_IOS'. Once you start adding more nodes to compliance you can group them together with node groups, and also link them all at one to your policy through this form.

Now all that's left is to make sure that your nccmd daemon is running, and you have a compliance license for this node. You can check this in the 'Licensed nodes' tab. You'll have to wait a bit for the daemon to wake up and start evaluating compliance. It should wake up every 5 minutes, but if you're impatient you can use the 'force daemon' button in the NCCM form.
Once the compliance check is finished, you can see its results in the report form. More on that in another article.
Related Articles
CVE - How to create Compliance policies for Common Vulnerabilities and Exploits.
Below is an example about building compliance policies from the CVEs. We will be using CVE-2018-0282 for this case. Creating Policy (1) Compliance -> (2) Policies -> (3) New -> (4) Name: CVE-2018-0282 -> (4) Save Applying to all vendor Nodes Under ...How to create new policy
Policy creation overview Compliance policies are used for validating the device configuration and its state. Compliance Policies are accessible from main menu as below: Compliance -> Polcies There are 4 steps in creating a policy. Step 1: Name the ...How to create Compliance Reports
Compliance reports gives us the summarized results of the policies. Accessing Compliance Reports Creating new report Steps to create new report Report name: Login Banner Report -> Report type: Policies -> Policy name: Login banner Downloading ...Compliance reports - Checking software version
In this article, we are creating a Compliance report for Cisco IOS nodes to check its software version is 15.2 or not. Steps involved are: Creating the policy Maping the Cisco_IOS nodes Creating Rule Creating the condition Creating Reports Creating ...F5 load balancer - How to create compliance policies
This article is a technical overview of the basics of compliance, and how you can check that a node's config contains the lines you want it to contain. What you need is a node, modeled in NetYCE (CMDB works as well) that has a configuration stored in ...